
Page Guides
These guides explain the basic editor actions related to pages. Creating a new page, editing and configuring pages, and deleting existing pages is covered here.
What is a page?
A website consists of a collection of pages. Each page has a unique address (URL), and content on each page is created using one or more components. Except for a few exceptions, there are only three page types available: The Front Page, which is the entry page of the website, The Section Page, which can only be created below the Front Page, and the Content Page, which can be created in multiple levels below the Section Page.
There are very few restrictions on which components can be added to which pages, so each page can be customized to present the desired information, using the components as building blocks.
All pages have an initial mandatory component, the Content Header, and this cannot be moved or deleted from the page. This ensures that the page contains the correct main content elements required.
How to insert a new page
To create a new blank page on your website, do the following:
- Log in to Sitecore Edit Mode.
- Navigate to the page, where you want to create your new page under.
- Click the Insert Page button.
- A dialogue window opens. Select the desired page type, enter the name of the page and press OK. Note that this name will be part pf the URL for the page, so be sure to name it properly. Feel free to uses spaces and other special characters, as the system will replace spaces with dashes and translate other characters as well to make for a nice SEO-friendly URL.
In this example, Content Page is the only page option, and the name is set to Page Guides. On creation, the name will be translated to Page-Guides, but the original name will also be transferred to the Page Title property. - The new page is created and you are redirected to the page. By default, the page is empty except for the mandatory Content Header component at the top of the page. The Content Header will show the Page Title as the main header of the page.


How to edit a page
To edit the content on a page, do the following:
- Go to Sitecore Edit Mode.
- Navigate to the page you want to edit.
- Edit content directly in the view.
- Click the Save button.
- if the content is ready for the live site, remember to Publish the content (see the publishing guide below).
Overall, there are three aspects of page editing:
- Editing the Content Header
The Content Header is a component fixed to the top of every page. It contains the base content of the page like the Page Title, and it mandatory on all pages, so it cannot be deleted or moved. You can switch between a couple of different Content Header variants to change the appearance. The Content Header contains the same configuration options as other components. See the Components Guides for more information on variants and component configuration. - Editing components
Most of the content on any page will consist of components inserted on the page in designated zones. There are a large set of components available for insertion, but they all share the same basic editing principles. See the Components Guides for information on editing components. - Editing the page configuration
This is covered in a separate guide below.
How to edit the page configuration (metadata)
All pages have individual configuration options, that are not directly visible on the screen. Each option is described in detail below the guide.
These options are accessed through the Content Header:
- Go to Sitecore Edit Mode.
- Navigate to the page you want to edit.
- Click the Content Header component.
- This reveals the Content Header Menu. Click the Page Metadata button.
- This opens a dialogue window with various configuration options (described in detail below). Make the desired changes to the page configuration and click OK.
- Remember to save the page to store the new settings. Saving the page also makes Sitecore reload the page, displaying any settings influencing the layout of the page.

Page Tags Configuration Options (Taxonomy only)
- Page Type
If the website is configured to use Taxonomy, a set of predefined page types will be available in this property. Select a page type from the list to mark the current page as a page of that type. - Tags
If the website is configured to use Taxonomy, a set of predefined Tags will be available in this property, organized in Tag Collection folders. Select one or more tags from the list to associate the current page with these keywords.
For more information on page types and tags, see the Taxonomy Guides.
Page Display Configuration Options (Layout)
- Hide In Navigation
By default, all pages are visible in menus and lists. For instance, if you create a Section Page directly below the Front Page, a link to the page will show in the top menu. If a list configuration includes a page in the result, the page will show as an item on the list. In some cases it makes sense to remove a page from menus, for instance the search result page, which is actually located just below the front page. Check the Hide In Navigation box to remove the page from menus and lists. The page is still online and reachable through direct linking (a manual link created in the text or in a component), but will not appear in automated menus or lists. - Hide Share Buttons
If the website is configured to include social media sharing buttons, all pages will display the sharing buttons on that website. On some pages, however, the sharing options are not relevant or the buttons conflict with the page layout. Check the Hide Share Buttons box to hide the buttons on that particular page. - Hide Page Metadata
With this property, the context of metadata is the meta information available on a page, displayed next to the social media share buttons. It includes author information, date and any associated tags. Check the Hide Page Metadata box to hide the page information on the specific page. - Page Menu Title
By default, the Page Title is used as the title for the page throughout the website, both as the main header on the page and also in menus and lists. However, sometimes the Page Title may be too long to fit properly in a menu or on a list. If the Page Menu Title property is filled out - ideally with a shorter variant of the Page Title - this property will be shown in menus and on lists, while the Page Title still shows as the main header on the actual page. - Page Custom List Image
By default, lists will look for an available image to display for each page. A list will use the Page Image or the Content Header Background Image - bot set on the Content Header component. Images inserted in components on the page are not available for list display. If there are no available images or if another image is more relevant for display on lists, use this property to define a list image. - Hide Date
This property is used to hide the date of a specific page, both on the page and on lists displaying the page. - Hide Breadcrumb
If the website is configured to include the breadcrumb menu, all pages will display the breadcrumb on that website. On some pages, however, the breadcrumb is not needed or the layout of the page does not support the breadcrumb. Check the Hide Breadcrumb box to hide the Breadcrumb Menu on that particular page. - Page Icon
It is possible to associate an icon to a specific page using this image property. The icon is displayed in the page information section (author, date, tags) but also on lists configured with the list type "Graphic List". See the Manual List component for more information. - Font Awesome Page Icon Name
Instead up adding a custom image as icon in the Page Icon property above, you can make use of a preinstalled icon library called Font Awesome. Type the name of the wanted icon in this property for use in the same cases as with Page Icon above. See the Font Awesome website for an overview of icons available (version 4.7.0).
Page Metadata Configuration Options (SEO and Social Media)
- Metadata Title
The Metadata Title (<title>...</title>) is a hidden title property on each page. It shows as the text in the browser tab on the current page, but it is also the preferred title for search engines like Google to display in the search result. By default, it inherits the content of the Page Title. In some cases in can be relevant to rewrite the title for display on Google, and this is possible by filling out this property. - Metadata Description
Like the Metadata Title, the Metadata Description(<meta name="description" content="..." />) is a hidden property, mainly used by search engines as the summary text displayed for a specific search result. By default, it inherits the content of the Page Summary, edited through the Content Header component. If there is no Page Summary text on the specific page or if the editor would like to rewrite the text for display on Google, it is possible by filling out this property. If there is no summary and this property is not filled out, Google will search for an appropriate text snippet to display, which can lead to unwanted results. - Custom Open Graph Title
The Open Graph Title property is a hidden value used by social media when a user shares the page in a post. The property inherits the Metadata Title, which again inherits the Page Title for content. In rare cases, it can be relevant to individually control the title of a page shared on various social media, and this property enables that. - Custom Open Graph Description
The Open Graph Description property is a hidden value used by social media when a user shares the page in a post. The property inherits the Metadata Description, which again inherits the Page Summary for content. In rare cases, it can be relevant to individually control the summary text of a page shared on various social media, and this property enables that. - Custom Open Graph Image
The Open Graph Image property is a hidden value used by social media when a user shares the page in a post. The property has a number of fallback steps to ensure an image to display: Page Custom List Image > Page Image > Content Header background Image. Images used in components on the page are not available for fallback, however. In case you want to control which image will show when sharing the page on social media, add an image to this property.
Note that a copy of the content is usually saved by the social media the first time the page is shared, so adding open graph data afterwards may not show until each social media provider refreshes their copy, which can takes days or even weeks.
How to delete a page
When deleting a page, it is important to understand how the structure of pages work. Pages created below another page are structured as subpages (or child pages) to that page (the parent page). If you delete a page, you also delete a parent page, you implicitly delete all potential child pages below.
- Go to Sitecore Edit Mode.
- Navigate to the page you want to delete.
- Click the Delete page button.
- A dialogue box opens. If you are certain you want to delete the page (and any child pages), click OK.
- The page is removed from the website and stored in the Sitecore Recycle Bin. If the page has been online on the website, it will remain online until you carry out the publish task. See the publishing guide below.

Note: If you delete a page by accident, the page is not erased completely. Instead, it is moved to the Sitecore Recycle Bin and can be restored from there. This is done through Sitecore Desktop login option.
How to publish a page
When you are logged into Sitecore, you access all the created content on the website - both published and unpublished. For instance, when you create a new page, it will show in Sitecore, but it won't appear on the live website until a publishing action is carried out. This content comes from the Master Database.
When you access your website (without being logged into Sitecore), you see the actual published content that all end users see. Unpublished content is not present here. This content comes from the Web Database.
Publishing content means transferring content from Sitecore to the live website - from the Master Database to the Web Database.
The publishing action is simple:
- Go to Sitecore Edit Mode.
- Navigate to the page you want to publish (with a few exception scenarios explained below).
- Click the Publish button.
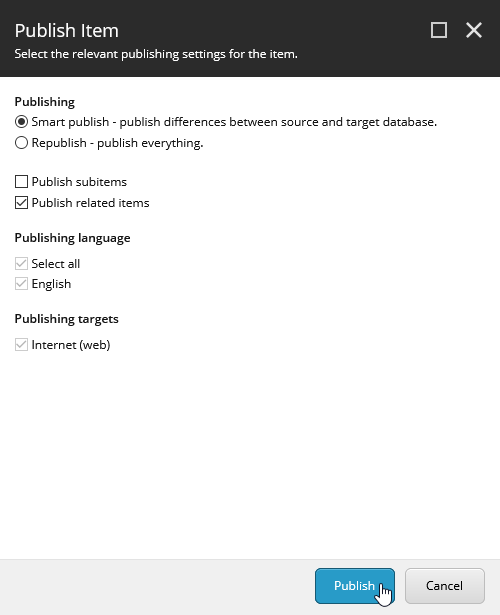
- A dialogue window appears. In most cases, settings here should be:
- Publishing: Smart Publish
- Publish subitems: Unchecked
- Publish related items: Checked.
- Language and Targets are read-only.
- Set the desired settings and click the Publish button.

Depending on what editorial change you want to publish, there are a few differences in the publishing process:
- Publish a new page/changes to an existing page
Click Publish on the page with default settings. Remember to check the Publish Related items checkbox, as the content of each component on the page is stored in Sitecore as an individual item (a datasource) and is seen as a related item. - Unpublish a deleted page
Navigate to the parent page of the page you deleted and click Publish with default settings. Since page actual page is not in the structure anymore, you cannot publish the deleted page itself. - Publish multiple changes to multiple pages
The checkbox Publish Subitems enables you to publish the current page AND every child page underneath. This is useful when publishing a whole section of a page in one action, but beware that you might publish content from other editors not ready for the live site. - Publish changes to the order of pages (Sitecore Content Editor only)
Changing the order of pages, e.g, the order shown in the top menu, requires that you log in to Sitecore Content Editor and make the order changes in the tree structure of the site. To publish the changes, you need to navigate to the parent page and check the Publish Subitems checkbox when you publish, as the order information exists on each of the child pages.
Learn more about pages and components
-
Page Structure
Read moreEvery page in the solution shares a common structure foundation consisting of a set of zones.
-
Page Types
Read moreThere are only a few base page types available in the system, but each site can define a set of page types
-

Component Guides
Read moreThese guides cover all the common actions that editors will need to master when working with components. Inserting, editing, moving and deleting components is covered here.
